 Physix Frontier
Simple Tutorial: Creating a Skill in WorkBuddy
Simple Tutorial: Creating a Skill in WorkBuddy
Applicable Version: WorkBuddy 5.5.4 (Windows Desktop). Button positions may vary slightly in other versions, but the process is basically the same.
First, What Exactly Is a Skill?
A Skill is essentially a "specialty package" installed for WorkBuddy. Instead of explaining requirements from scratch every time you want it to perform a fixed task (e.g., "Organize meeting notes into weekly reports every time" or "Convert PDFs to Markdown"), you can bundle these requirements into a skill and invoke it with a single command later.
The good news is: Creating skills in WorkBuddy doesn't require you to write code or understand formats. It has a built-in assistant specifically for "creating skills," so you just need to describe your needs in plain language.
Preparation
- WorkBuddy is installed on your computer, and you are logged in.
- Clearly think about: What exactly should this skill help you do? This step is more important than all subsequent clicks—the more specific you are, the better the resulting skill will work.
Step 1: Open "Experts · Skills · Connectors"
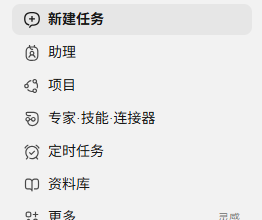
In the left navigation bar of the WorkBuddy main interface, click Experts · Skills · Connectors.
Step 2: Switch to the "Skills" Tab
Inside, there are three tabs at the top: Experts / Skills / Connectors. Click the middle one, Skills.
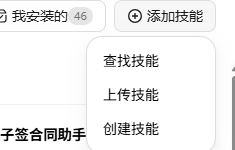
In the upper right corner of the page, you will see three entry points: Search Skills, Installed by Me (Number), and Add Skill.

Step 3: Click "Add Skill" → "Create Skill"
Click Add Skill in the top right corner. Three options will pop up:
- Find Skill: Look for ready-made ones in the skill market.
- Upload Skill: Import a skill file given to you by someone else.
- Create Skill: Build your own from scratch. 👈 Choose this one.
Step 4: Fill in Your Requirements in the Input Box
After clicking "Create Skill," WorkBuddy automatically creates a new task for you. The input box is pre-filled with a skill-creator (the skill-building assistant) and a template:
Please help me create a skill that can implement "..."

Your job is to replace "..." with your specific requirement and send it. For example:
- Please help me create a skill that can implement "Organizing WeChat favorites articles into Markdown notes with summaries"
- Please help me create a skill that can implement "Automatically generating last week's sales data report every Monday afternoon"
To make the resulting skill more reliable, clearly specify these points: What task to perform, what the input is, what the desired output looks like, and any special formatting or precautions.
Step 5: Follow the Dialogue to Supplement Details and Wait for Completion
After sending, the skill-creator will ask you to confirm some details (such as name, trigger timing, specific steps). Just answer its questions; you don't need technical knowledge. Once clarified, it will generate the skill and automatically install it to your account.
How to Use It Once Created
Return to Experts · Skills · Connectors → Skills → Installed by Me to see the newly created skill. In future new tasks, simply call it using / or @ in the input box, or describe your need in a sentence, and WorkBuddy will determine which skill to use.
Frequently Asked Questions
Can't find the "Add Skill" button?
Make sure you have switched to the "Skills" tab, not "Experts" or "Connectors." The button is in the top right corner of the page.
Which of "Find / Upload / Create" should I choose?
Use "Find" if there's a ready-made one in the market; use "Upload" if someone sent you a skill file; use "Create" only if you want to build a new custom skill.
What if I want to stop halfway through creation?
This process is essentially starting a dialogue task. You can stop replying or delete it at any time without affecting other functions.